Column Classification Window
Column Classification Window
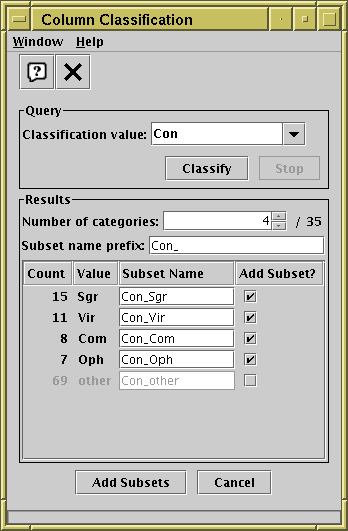
The Column Classification Window takes a column or other algebraic expression, and generates a number of mutually exclusive Row Subsets based on its contents. For instance if you have a column with different integer values representing different object types, this window will let you add a new subset to the table for each of the distinct values (object types) appearing in the table. Each subset contains rows with a single value of the classification expression you supply. In the above example, a new subset will be created for each of the four most commonly-occurring constellations in the table.
You can activate this dialogue using the
Classify By Column (![]() ) button in the
Subsets Window.
) button in the
Subsets Window.
In the Query panel, you specify the
expression you want to classify on.
You can select a simple column name from the drop-down list,
or type in an algebraic expression as described in Section 7.
If you want to classify on ranges of values rather than exact
equivalence you can use an expression that rounds to an integer,
for instance "toInteger(RMAG/2.0)*2" would give you subsets
corresponding to bins of width 2 in magnitude.
When you have entered the expression, you may need to click the
Classify button to start the classification
(or it may happen automatically).
The classification will often complete straight away,
but for large tables it could take a noticeable amount of time,
in which case a progress bar is shown at the bottom of the window.
You can stop a long-running classification in progress with the
Stop button.
If you have a very large table with many distinct categories in the given
column, the process can take a lot of memory - if the application runs out
of memory, a warning will pop up and the classification will not complete.
When the classification has run, the results are displayed in the Results panel. Two fields control the way these results are displayed:
The results are displayed in a table, each row corresponding to a Row Subset that can be added to the table based on the classification. The subsets are shown in decreasing order of popularity (the subset containing the most rows is listed first). The final row, labelled "other", groups all the rows which are not in any of the other currently selected and displayed subsets. The following columns are shown:
When you have adjusted subset names and selected the ones you want to add, click the Add Subsets button at the bottom, and one subset will be added to the table for each of the items with the Add Subset? checkbox ticked. If you don't want to add any of these subsets after all, just hit Cancel or close the window.